C320 Snap Davit Installation
Snap Davits for Sailboat
About the Author: David Swanson and family currently sail their 2007 Catalina C320 MK II sailboat, Emily Ann, out of Shilshole Bay Marina on Puget Sound. They originally kept their boat in San Diego and sailed it for two years there exploring the SoCal coast and Catalina Island before moving their boat to their home waters of Puget Sound.
Objective
Cruising Southern California and the Puget Sound on our 2007 Catalina 320 MK II Sailboat requires that we carry an inflatable dinghy. To make the process of carrying the inflatable easier, I mounted a tilt-up davit system that is traditionally used for power boats to our Catalina 320 sailboat. The tilt-up davit system was manufactured by Weaver Snap Davits (www.weaverindustries.com) and adapted to our C320 MK II. Our inflatable dinghy is an Achilles LSI 2.90 (www.achillesinflatables.com). The length of the Achilles inflatable is 9’-6” which is well within the 11’-9” beam of our Catalina 320.
About 10 years ago, when our children were much smaller, I installed a similar set of snap davits on our Hunter 30 sailboat. The system is very easy to use, helps in boarding the dinghy, and keeps the inflatable secure and out of the way when sailing or motoring. It is an elegant way to carry our inflatable dinghy when sailing, cruising, and island hopping.
This new set of Weaver Davits that I installed on our C320 MK II are slightly different with a “snap up” feature. We had Weaver industries build a custom set of Snap Ups to match the angle of our C320 transom and also install an “intermediate” snap up hole to allow us to vary the height at which we carry our inflatable dinghy. I created a sketch of the dimensions and rake angle of our stern from our C320 and provided them to Weaver Industries for the fabrication of our davits, so if anyone would like them, just send me an email and I can forward a PDF copy of the dimensions that we used for our 2007 C320 MK II sailboat.

2007 Catalina 320 MK II, Emily Ann, with Inflatable Dinghy Stowed on Davits
We have had many people comment on how elegant this system works to stow our inflatable, so I thought that I would share our installation with fellow C320 owners.
The rest of this article explains how these were installed.
Materials
The following materials were used for our davit installation:
- Weaver Snap Up Davits custom modified for our C320 MK II stern.
- Weaver Quick Kit (with stainless steel backing plates) mounting system to remove davit brackets when not in use.
- Weaver Rubber Pads and Stainless Steel Yoke Kit for inflatable dinghy.
- Weaver Stand Offs.
- 3M 5200 sealer for mounting quick kit to stern seats.
Installation Procedures
- Measure Twice, Cut (Drill) Once: To line up the davits on our stern, I measured everything off the boat and dinghy centerlines. Since you will be drilling holes in your swim steps, it is important to measure twice to ensure that the system fits your boat.
- Install Pads and Yokes on Dinghy: Inflate dinghy and install the davit mounting pads and stainless steel yokes per the manufactures instructions. Once these pads are installed, the actual center-to-center dimensions of the davit locations can be determined. This dimension will be utilized to locate the davit mounting locations on the stern seats.
- Locate Davit Quick Kit Plates: Utilizing the center-to-center dimensions of the davit mounting yokes that were installed on the dinghy, line up where the davit mounting Quick Kit plates should be positioned on top of the stern seats. For my mounting, I measured everything off of the sailboat centerline and confirmed all measurements before drilling.
- Drill and Install Quick Kit Plates: Again, measure twice and drill once. Once the mounting Quick Kit plates are located, drill four holes to mount the Quick Kit plates. After the holes were drilled, I outlined the plates with blue painters tape to mask the area around the plates to avoid smearing the 3M 5200 mounting adhesive. I used a liberal supply of 3M 5200 adhesive between the bottom of the stainless steel Quick Kit plate and the top of the stern seat to ensure a watertight and permanent seal between the davit mount and the fiberglass stern seat. After installation of the plate, sealant and bolts, I let the sealant cure for about 3 days before tightening the mounting bolts. This effectively allows the cured 3M 5200 to act like a gasket between the plate and the fiberglass. Before tightening the mounting plate, I trimmed the “bled” sealant from around the stainless steel davit mounting plate and remove excess sealant by removing the blue painters masking tape. Once tight, the mounting plate is firmly attached to the fiberglass stern seat providing a solid foundation for the davit system. The sealant installation is clean and neat.
- Install Stand Offs: Once the dinghy is installed on the davits and tilted vertically, you need a way to secure the dinghy to the stern rail of the sailboat. I installed Weaver Stand Offs on 1/4 inch thick white Starboard plastic mounted to removable rail mounts. This way I can remove the stand off brackets when I am not using the stern davits. These removable stern davits can be positioned anywhere on the stern rail that provides a suitable location for the stand off and a firm foundation to hold the stowed inflatable dinghy.
- Davit Use: Now that the davits and stand offs are installed, they are ready for use. For our use, we typically do not have the davits and stand offs installed when we are day sailing without our inflatable. When we go cruising in the islands and bring along our inflatable dinghy, we install the snap davits in the mounting plates on our stern seats and install the stand offs. To stow the inflatable, we bring the inflatable up alongside our stern, snap the yokes into the snap davits, remove the outboard motor and install it on the stern rail mount, then tie the painter on the line near the oarlock opposite of the davits. I then raise the snap davits to the middle or high position and snap it into place. Once on board, I lift the inflatable out of the water using the painter line similar to raising a draw bridge. After the dinghy is vertical, I snap the stainless steel stand offs to the stern and bow mounts of the inflatable dinghy to secure it to the sailboat. Deploying the inflatable is the opposite of stowing it.
Overall, we are very happy with our “second generation” Weaver Snap Davit installation on our second sailboat. Davit installation is relatively simple. They are elegant to use, removable, and do not have the complexities that traditional stern davits have. These types of davits typically used on powerboats suit our sailboat purposes perfectly.

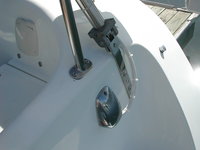
Removable Snap Davits Installed on Stern Seat

Top View of Inflatable Dinghy On Davits Ready to Stow

Inflatable Dinghy Snapped to Davits on Boat Ready for Boarding

Side View of Inflatable Dinghy Snapped onto Removable Davits

Stowed Dinghy on Davits

Snap Up Davits in Middle Position

What's Related